Your Press Nails Application Guide
How to Apply Press-On Nails
Beautiful nails in minutes. Learn how to apply your press-on nails using either nail glue for longer wear or adhesive tabs for quick, flexible, and reusable wear.
For the best result, always start with clean, dry, oil-free natural nails.
Watch First
Press-On Nail Application Video
Watch the video guide, then follow the step-by-step instructions below based on your preferred application method.
Before You Apply
Prep Is the Secret to Longer Wear
Proper nail preparation helps your press-on nails fit better, look smoother, and stay on longer. Do not skip this step.
Clean
Wash and dry your hands. Remove old polish, oil, lotion, dust, or residue from your natural nails.
Buff
Lightly buff the surface of your natural nails to remove shine and help the adhesive grip better.
Dehydrate
Wipe each nail with an alcohol pad or nail cleanser before applying glue or adhesive tabs.
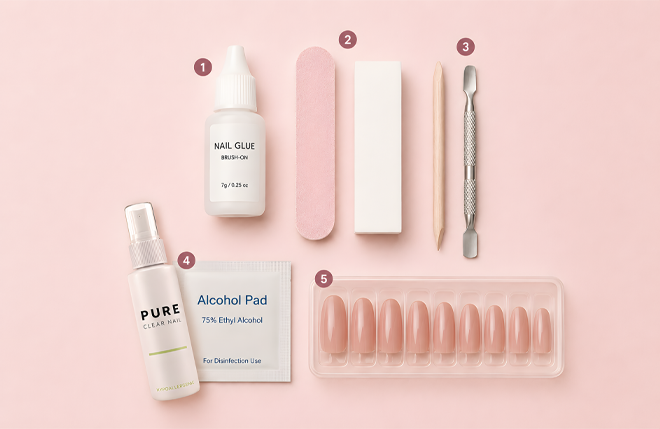
Method 1
Apply with Nail Glue
Nail glue is best if you want a stronger hold and longer wear. This method is ideal for vacations, events, busy weeks, or when you want your nails to stay on longer.
What You Need:
- Nail glue
- Nail file and buffer
- Cuticle pusher or orange stick
- Alcohol pad or nail cleanser
- Your press-on nail set
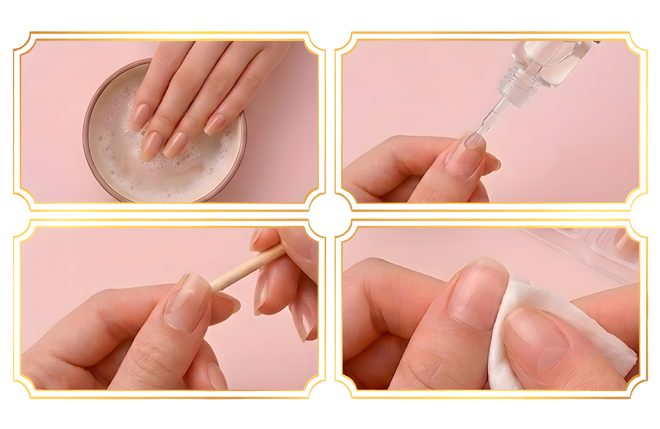
Step-by-Step: Nail Glue Application
01
Prepare Your Nails
Push back cuticles, lightly buff your natural nails, and wipe with an alcohol pad to remove oil and dust.
02
Choose the Right Size
Match each press-on nail to your natural nail. If needed, gently file the sides for a better fit.
03
Apply Nail Glue
Apply a thin, even layer of glue to your natural nail and/or the back of the press-on nail.
04
Press and Hold
Place the nail slightly above the cuticle, not on top of it. Press firmly for 10-20 seconds.
05
Repeat
Repeat the same steps for each finger. Make sure each nail is aligned before pressing down.
06
Let Them Set
Avoid water, lotion, oil, and heavy tasks for at least 1 hour after application.
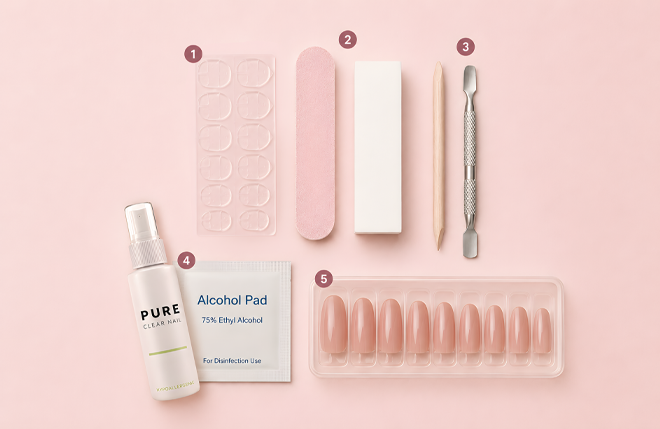
Method 2
Apply with Adhesive Tabs
Adhesive tabs are best for quick application, short-term wear, easier removal, and better reusability. This method is ideal for one-day events, photoshoots, weekends, or trying a new style.
What You Need:
- Jelly adhesive tabs or double-sided nail stickers
- Nail file and buffer
- Cuticle pusher or orange stick
- Alcohol pad or nail cleanser
- Your press-on nail set
Step-by-Step: Adhesive Tab Application
01
Prep Your Nails
Clean, buff, push back cuticles, and wipe each natural nail with an alcohol pad.
02
Choose Sizes
Select the best-fitting press-on nail and adhesive tab for each finger.
03
Apply the Tab
Place the adhesive tab onto your natural nail and press firmly to remove air bubbles.
04
Remove Top Film
Peel away the protective film from the top of the adhesive tab.
05
Press Nail On
Align the press-on nail from the cuticle area to the tip, then press firmly for 10-15 seconds.
06
Finish and Avoid Water
Avoid water, oil, and lotion for a few hours to help the tabs hold better.
Choose Your Method
Nail Glue vs Adhesive Tabs
Both methods work well. Choose based on how long you want to wear your press-on nails and whether you want to reuse them.
| Method | Best For | Wear Time | Removal | Reusability |
|---|---|---|---|---|
| Nail Glue | Longer wear, stronger hold, events, vacations | Usually 1-2 weeks, depending on application and lifestyle | Requires more soaking and patience | May be less reusable |
| Adhesive Tabs | Short-term wear, quick changes, easy removal | Usually a few days, depending on care and activity | Easier and gentler to remove | Better for reusing nails |
Long-Lasting Tips
How to Make Your Press-On Nails Last Longer
A few simple habits can help your nails stay secure and look beautiful for longer.
Keep Nails Dry
Avoid water for at least 1 hour after using glue and a few hours after using tabs.
Avoid Oils
Do not apply lotion, cuticle oil, or hand cream right before application.
Press Firmly
Hold each nail firmly in place to help create a stronger bond.
Use Gloves
Wear gloves when washing dishes, cleaning, or using harsh products.
Removal Reminder
Remove Gently to Protect Your Natural Nails
Never pull or force press-on nails off. Gentle removal helps protect your natural nails and may help preserve your press-on set for future wear.
- For adhesive tabs, soak in warm soapy water and gently lift from the side.
- For nail glue, soak longer and allow the glue bond to soften before removal.
- Use cuticle oil to help loosen the adhesive.
- Stop if you feel pain, pulling, or discomfort.
Visit our How to Remove guide for detailed removal instructions.
Important Note
Application Results May Vary
Wear time depends on nail preparation, application method, adhesive type, daily activity, exposure to water, and natural nail condition.
For best results, make sure your natural nails are clean, dry, oil-free, and properly sized before applying your press-on nails.
Need Help?
We’re Here to Help
If you have questions about sizing, application, adhesive tabs, nail glue, or removal, our support team is happy to help.